Vendor: ElectraStim
For over 5 years, I have been doing reviews of e-stim power boxes and electrodes on this website. Through the annual E-Stim Specials and e-stim being one of my favorite things as a bottom, I have earned a bit of a reputation of being an e-stim expert. So naturally I was thrilled when ElectraStim approached me in late 2018, asking me if I would be interested in beta-testing a top secret project: Their new state of the art power box AXIS. They sent me a beta version I have played around for a couple of weeks now.
My review sample being a beta version makes this review a bit special. Due to the NDA I signed, this review is purely based in my own experience. No testee panel members were involved. Also ElectraStim told me that the software was not 100% final so there might be minor changes or little glitches in the user interface for example. I did not encounter these glitches. However, I will update this review along the lines of the production unit’s “proper” testing. Finally, the packaging and what comes with the box was also not a 100% final. As soon as I receive the real deal, I will do an unboxing [Update Feb 3rd 2019: The unboxing of the production unit has been published].
With that in mind, let’s cut to the chase…
Construction & Operating AXIS
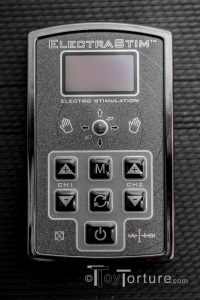
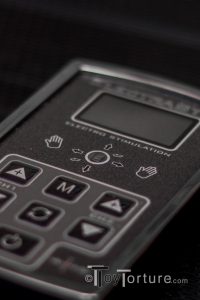
The design of the AXIS follows the one of the other ElectraStim power boxes: The case itself is a made out of a sturdy black polymer with a soft-touch surface. The control panel on the top is framed by a silver bezel while the panel itself has a silver-sparkling charcoal color. On top of the control panel there is a 35x20mm turquoise light LED matrix display. In the top left and top right corner a little number indicates the current power level of the left and right channel. Between them there is the current program set written and the battery level indicator. The lower 4/5th of the screen is divided by a dotter line which separates an area for each channel to visualize the stimulation and/ or output level of the currently selected program either through blinking or diameter-changing circles (wave and pulse set) or a bars (flick, tilt, proximity, microphone and line-in set). Below the display is the photocell which can detect proximity as well as movement direction up to 10cm distance.
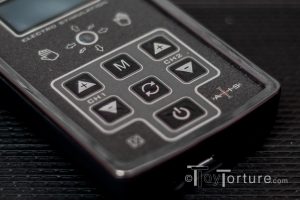
The lower half of the panel is covered by the control buttons. On the left and on the right are the power up/ power down buttons for the two channels. When keeping the “Up” bottons pressed, there is a 1 1/2 second lag before the intensity goes up quickly which is a useful safety feature against operation errors. On the way down, the lag is considerably shorter with half a second. Though if something goes wrong, never turn the box down. Just pull the lead out of the socket. A weird quirk of AXIS is that the maximum intensity is set at level 50 instead of 99 or 100. This is not only counter-intuitive, but makes the communication when maxing the unit a bit awkward. “I took you all the way to 50.” does not really inspire. I already communicated this impression to ElectraStim and I hope they fix it in an update.
In the middle of the upper row is a button labeled “M” for going through the seven program sets (wave, pluse, flick, tilt, proximity, microphone and line-in) and finally the configuration menu. To choose a stimulation pattern inside a set, press the button with the two arrows forming a circle located just below the “M” button. In order to select it, leave the cursor on the setting for 3 seconds and it will be selected. When pressing the double arrow button while stimulation firing, it will take you to the selection menu of the current set. Every time a new stimulation pattern is selected, the output level is set to zero on both channels. The lowest button is the power button which turns the unit on and off.
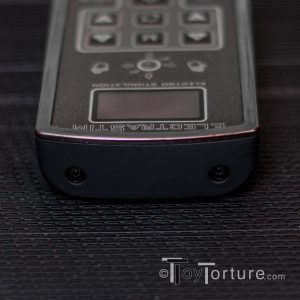
The rest of the box is fairly standard stuff: On top of the case there are two 2mm sockets for the leads, at the bottom there is a 3.5mm line-in, a micro-USB port for charging and the microphone.
Measuring just 112x70x23mm and weighing just 116g, the AXIS is the lightest and smallest of the high-end power boxes. This attribute is bought by the fact that instead of using 9V block batteries, the AXIS has built-in lithium-ion battery. Depending on the stimulation intensity, it will last for about 6 hours. However, if you run out of battery life mid scene, you are screwed. Not only do you have to have a power bank or a USB power supply and a micro-USB cable at hand but the unit can’t be used while charging! To get from zero to 80% takes about an hour, the last 20% will take an additional three.
Playing with AXIS
Little preview: The AXIS is currently the most versatile power box on the market. But this comes with a price: The Arduino inside the box takes 11 seconds to boot. What is extra irritating are the first 3.5 seconds until the display is initiated. During this time I often wondered if the box actually started or not.
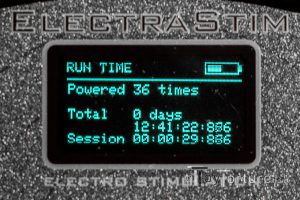
The sophisticated hardware allows for some nice features. In the settings menu, there is a “Run Time” info which tells you how often you have powered up AXIS, how long you have used it in total and how long is has been since the box has been powered up this time. Especially for extreme e-stim aficionados is the “Nerd Mode”. It turn additional information of the current running programs of Wave, Pulse and Tilt on, like the frequency at the bottom of the screen, below the program visualization. In all modes there is a little thick bar at the bottom of the separation line in the middle of the screen. The higher the bar, the more energy is consumed.
Usually in this part of an e-stim power box review comes the description of the programs. But AXIS has a whopping 47 (!) build in. So for the sake of reading flow, I put the large table below my conclusion box at the end of the article. What I found a bit disappointing was the fact that I could not modify any of the programs. I received the AIXS beta pack without a manual, so I had to discover the box and features on my own. When I turned on Nerd Mode with the details of the program displayed on the screen, I intuitively expected to be able to modify them. But no key combo worked. So I got in touch with ElectraStim and they confirmed that indeed the programs cannot be altered – yet. It is the beauty of the Arduino inside that it is such a powerful SoC which leaves space for development. The company said that the master mind behind AXIS’ development will look into adding the manipulation feature to the programs if possible.
In other e-stim power box reviews I already talked about in length what evil things can be done using a microphone (for example a self-enforcing circle of pain once the sub starts screaming), the line-in (like using a synthesizer to “play” your own programs) or the movement sensor. The newest sensor is the proximity sensor which yields hours of devious fun. Just to give you some ideas: Hold it in front of a pendulum, use your sub as a screaming “light barrier” at a passage or let him participate on another sub getting spanked or fucked by a fuck machine. Placing the motion sensor is a bit tricky and takes some time to figure out, but once figured out, it is a devilish tool.
Just like its (grand)father the SensaVox, AXIS s a very powerful unit! Using the ElectraStim Prestige ElectraLoops with a wave program, I started to notice the sensation with AXIS at 10% of the maximum intensity, while I had to take the E-Stim Systems 2b and the ErosTek ET312b up to 18% of the maximum intensity.

Detail of AXIS Bottom’s Interfaces from Left to Right: 3.5mm Jack for Audio Line-In, MicroUSB Port for Charging, two Microphones
Speaking of comparing it to the main competitors: What I personally did not miss but probably many will, is a remote control feature. With E-Stim Systems’ Connect service for the 2b, they set the bar for easy to use and powerful remote e-stim scenes. Maybe it will be one of the features added later in an update but. But if you are looking for a box for web cam scenes, look elsewhere. If you are looking for the most versatile, scene layout creativity inspiring and deviant e-stim power box out there, get AXIS!
ElectraStim will be accepting pre-orders starting Jan 7th 2019 and according to my latest information, they will start shipping on Jan 15th 2019. Furthermore, I have not yet been told the price. As soon as I get new pieces of information, I will publish them here and on Twitter.
| Conclusion: Powerful e-stim powerbox with many sensors for creative scenes. | ||||
| Pro | Cons | Where to get | Price | |
| Powerful | Programs can’t be modifies | ElectraStim | £349 | |
| Plethora of diverse programs | No remote control feature | |||
| Many different sensors | ||||
| Max intensity is labeled 50 | ||||
| Graphic display with intuitive visualization | ||||
| Battery not exchangeable | ||||
| Light and compact | ||||
| Can’t be used while charging | ||||
Program Description
| Number | Program Name | Description |
| Wave 1 | Continuous | Continuous output. |
| Wave 2 | Synchronized Slow | Long wavelength with synchronized output on both channels. |
| Wave 3 | Synchronized Fast | Short wavelength with synchronized output on both channels. |
| Wave 4 | Alternating Slow | Long wavelength with alternating rising and falling of the channels. |
| Wave 5 | Alternating Fast | Short wavelength with alternating rising and falling of the channels. |
| Wave 6 | Escalate Synchronized | Wavelength gets shorter over time and then drops to starting length, synchronized output on both channels. Cycle length: 70 seconds. |
| Wave 7 | Escalate Alternating | Wavelength gets shorter over time and then drops to starting length, alternating rising and falling of the channels. Cycle length: 70 seconds |
| Wave 8 | Builder Synchronized | Number of waves per wavelength increases as wavelength gets shorter, synchronized output on both channels. Cycle length: 58 seconds |
| Wave 9 | Builder Alternating | Number of waves per wavelength increases as wavelength gets shorter, alternating rising and falling of the channels. Cycle length: 58 seconds |
| Wave 10 | Tripple Synchronized | Set of three slow, medium and fast waves each, synchronized output on both channels. Cycle length: 18 seconds |
| Wave 11 | Tripple Alternating | Set of three slow, medium and fast waves each, alternating rising and falling of the channels. Cycle length: 18 seconds |
| Pulse 1 | Synchronized Slow | Slow pulses of stimulation, synchronized output on both channels. |
| Pulse 2 | Synchronized Fast | Fast pulses of stimulation, synchronized output on both channels. |
| Pulse 3 | Alternating Slow | Slow pulses of stimulation, alternating rising and falling of the channels. |
| Pulse 4 | Alternating Fast | Fast pulses of stimulation, alternating rising and falling of the channels. |
| Pulse 5 | Escalate Synchronized | Pulses that increase in speed and slow again, synchronized output on both channels. Cycle Length: 83 seconds. |
| Pulse 6 | Escalate Alternating | Pulses that increase in speed and slow again, alternating rising and falling of the channels. Cycle Length: 83 seconds. |
| Pulse 7 | Penetrate Synchronized | Simulation time of each pulse increases, synchronized output on both channels. Cycle length: 38 seconds |
| Pulse 8 | Penetrate Alternating | Simulation time of each pulse increases, alternating rising and falling of the channels. Cycle length: 38 seconds |
| Pulse 9 | Cascade Synchronized | Pulses start slow and increase in speed, synchronized output on both channels. Cycle length: 10 seconds. |
| Pulse 10 | Cascade Alternating | Pulses start slow and increase in speed, alternating rising and falling of the channels. Cycle length: 10 seconds. |
| Pulse 11 | Spank Synchronized | 1 pulse – 2 sec rest – 2 pulses – 2 sec rest – 3 pulses – 2 sec rest, synchronized output on both channels. Cycle length: 8 seconds. |
| Pulse 12 | Spank Alternating | First cannel 1: 1 pulse – 2 sec rest – 2 pulses – 2 sec rest – 3 pulses – 2 sec rest, then channel 2: 1 pulse – 2 sec rest – 2 pulses – 2 sec rest – 3 pulses – 2 sec rest. Cycle length: 15 seconds. |
| Flick 1 | CH1 + C2 | Both channel fire depending on movement intensity. Selected intensity for each channel is its maximum intensity. |
| Flick 2 | CH1 only | Channel 1 fires depending on movement intensity. Selected intensity for each channel is its maximum intensity. |
| Flick 3 | CH2 only | Channel 2 fire depending on movement intensity. Selected intensity for each channel is its maximum intensity. |
| Flick 4 | CH1 + CH2 Inverted | Channel 1 increases in stimulation while channel 2 decreases, depending on movement intensity. Selected intensity for each channel is its maximum intensity. |
| Flick 5 | CH1 Inverted + CH2 | Channel 1 decreases in stimulation while channel 2 increases, depending on movement intensity. Selected intensity for each channel is its maximum intensity. |
| Tilt 1 | CH1 + C2 | Both channels fire depending the on orientation. When AXIS is turned upside down the intensity is 0, laying flat it is 50% and upright is it 100%. Selected intensity for each channel is its maximum intensity.Selected intensity for each channel is its maximum intensity. |
| Tilt 2 | CH1 only | Channel 1 fires depending the on orientation. When AXIS is turned upside down the intensity is 0, laying flat it is 50% and upright is it 100%. Selected intensity is the maximum intensity. |
| Tilt 3 | CH2 only | Channel 2 fires depending the on orientation. When AXIS is turned upside down the intensity is 0, laying flat it is 50% and upright is it 100%. Selected intensity is the maximum intensity. |
| Tilt 4 | CH1 + CH2 Inverted | Both channels fire depending the on orientation.
Channel 1: When AXIS is turned upside down the intensity is 0, laying flat it is 50% and upright is it 100%. Channel 2: When AXIS is upright the intensity is 0, laying flat it is 50% and turned upside down is it 100%. Selected intensity for each channel is its maximum intensity. |
| Tilt 5 | CH1 Inverted + CH2 | Both channels fire depending the on orientation.
Channel 1: When AXIS is upright the intensity is 0, laying flat it is 50% and turned upside down is it 100%. Channel 2: When AXIS is turned upside down the intensity is 0, laying flat it is 50% and upright is it 100%. Selected intensity for each channel is its maximum intensity. |
| Proximity 1 | CH1 + C2 | Both channels fire depending the on how close the object is. Selected intensity for each channel is its maximum intensity. |
| Proximity 2 | CH1 only | Channel 1 fires depending the on how close the object is. Selected intensity for each channel is its maximum intensity. |
| Proximity 3 | CH2 only | Channel 2 fires depending the on how close the object is. Selected intensity for each channel is its maximum intensity. |
| Proximity 4 | CH1 + CH2 Inverted | Both channels fire on 50% of selected intensity. The closer the object, the closer channel 1 gets to 100% and channel 2 gets to 0%. |
| Proximity 5 | CH1 Inverted + CH2 | Both channels fire on 50% of selected intensity. The closer the object, the closer channel 1 gets to 0% and channel 2 gets to 100%. |
| Microphone 1 | CH1 + C2 | Both channels fire depending detected noise volume. Selected intensity for each channel is its maximum intensity. |
| Microphone 2 | CH1 only | Channel 1 fires depending detected noise volume. Selected intensity for each channel is its maximum intensity. |
| Microphone 3 | CH2 only | Channel 2 fires depending detected noise volume. Selected intensity for each channel is its maximum intensity. |
| Microphone 4 | CH1 + CH2 Inverted | Both channels fire on 50% of selected intensity. The louder the detected noise, the closer channel 1 gets to 100% and channel 2 gets to 0%. |
| Microphone 5 | CH1 Inverted + CH2 | Both channels fire on 50% of selected intensity. The louder the detected noise, the closer channel 1 gets to 0% and channel 2 gets to 100%. |
| Line-In 1 | CH1 Left + CH2 Right | Stereo processing of input. |
| Line-In 2 | CH1 Right + CH2 Left | Only left stereo channel is used to turn into stimulation. |
| Line-In 3 | CH1 + CH2 Left | Only right stereo channel is used to turn into stimulation. |
| Line-In 4 | CH1 + CH2 Right | The stereo channels are inverted. |




Pingback:ElectraStim AXIS Unboxing – ToyTorture.com